


手机购买

- 商品详情
- 类型:OLED & LCD 屏幕
准确的细节>>
准确的细节:
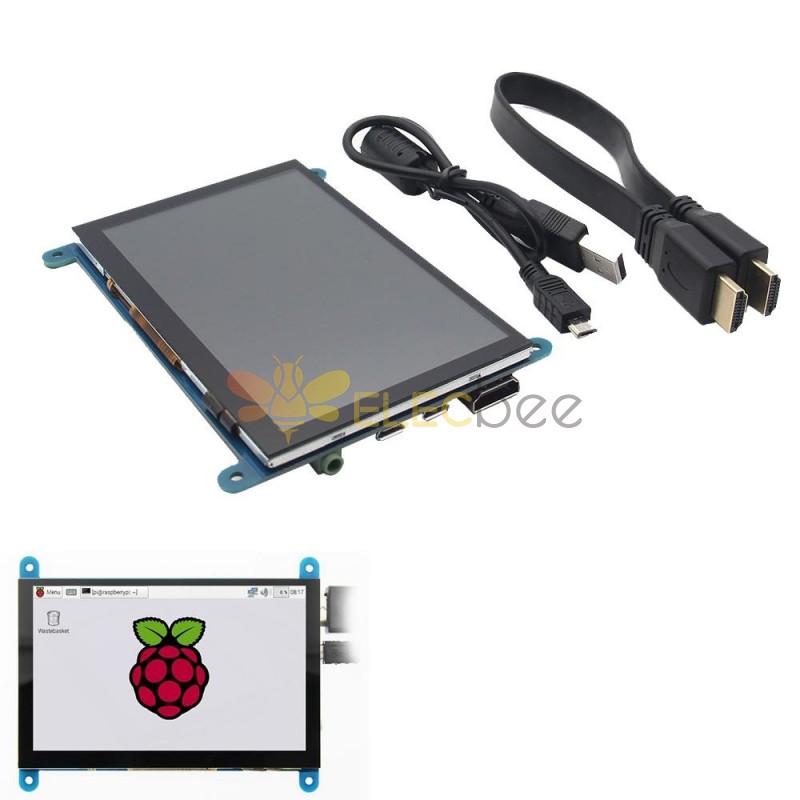
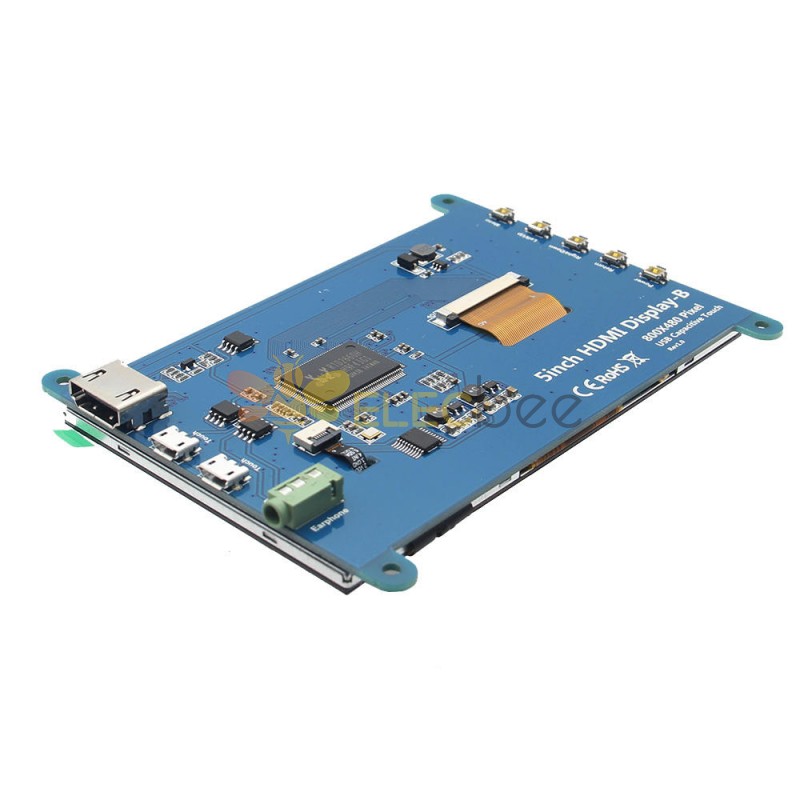
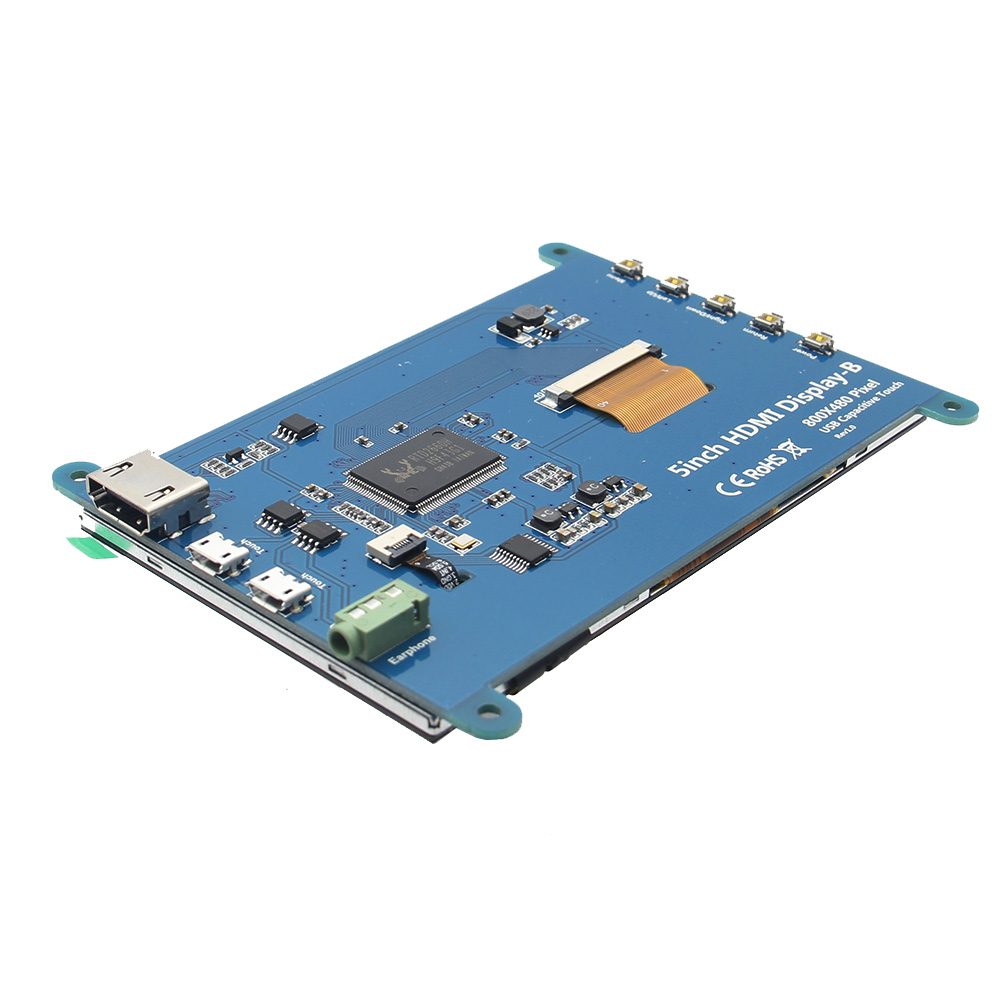
概述:-5" 标准显示器,800x480 分辨率
-Capacitive touch screen,support 5 point touch maximum
-Built-in OSD menu adjustment function (adjustable Contrast/ Brightness/Saturation,etc.)
-It is compatible with mainstream mini PC such as Raspberry Pi,BB Black,Banana Pi
-It can also be used as a general-purpose HDMI display,connecting computers,TV boxes,Xbox360, and so on
-Used as a Raspberry Pi display that supports Raspbian,Ubuntu,K0 di,Win10 IOT,single-touch,free drive
-Work as a PC monitor,support Win7,Win8,Win10 system 5 point touch (XP and older version system: single-point touch),free drive
-支持HDMI音频输出
-Passed CE,RoHS certification
规格:
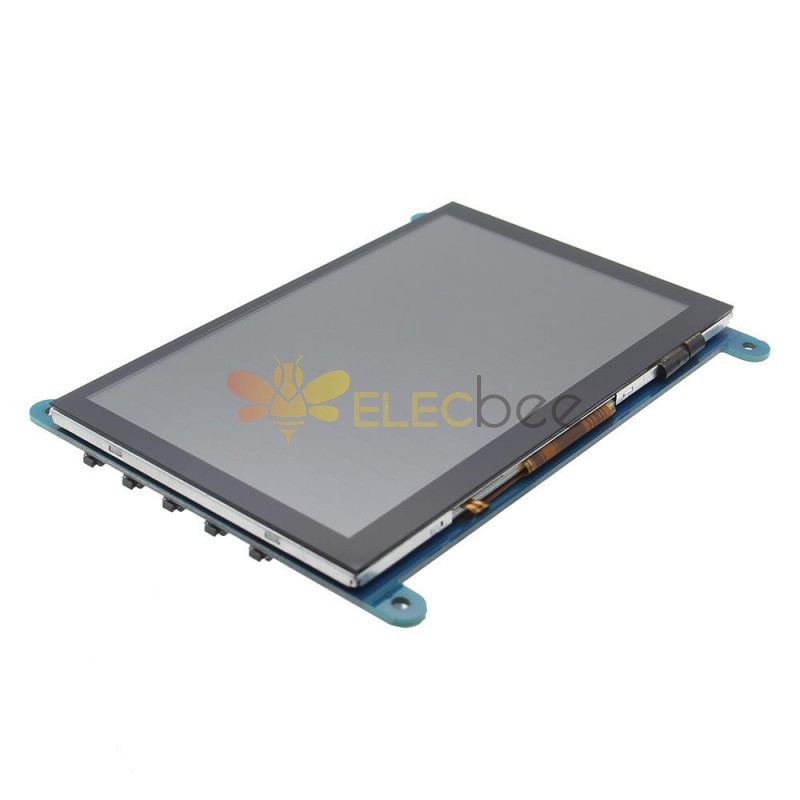
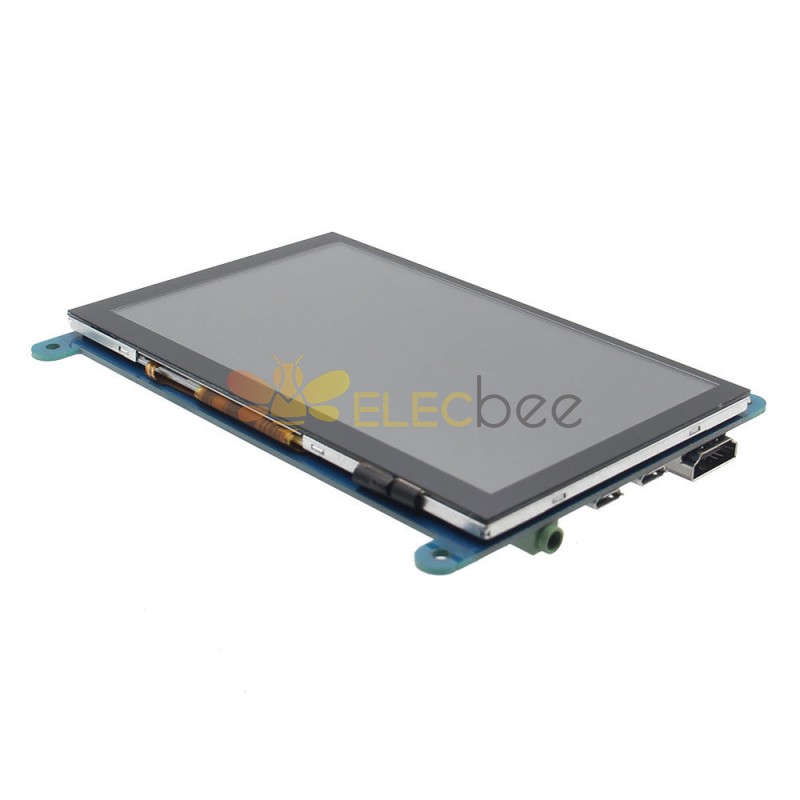
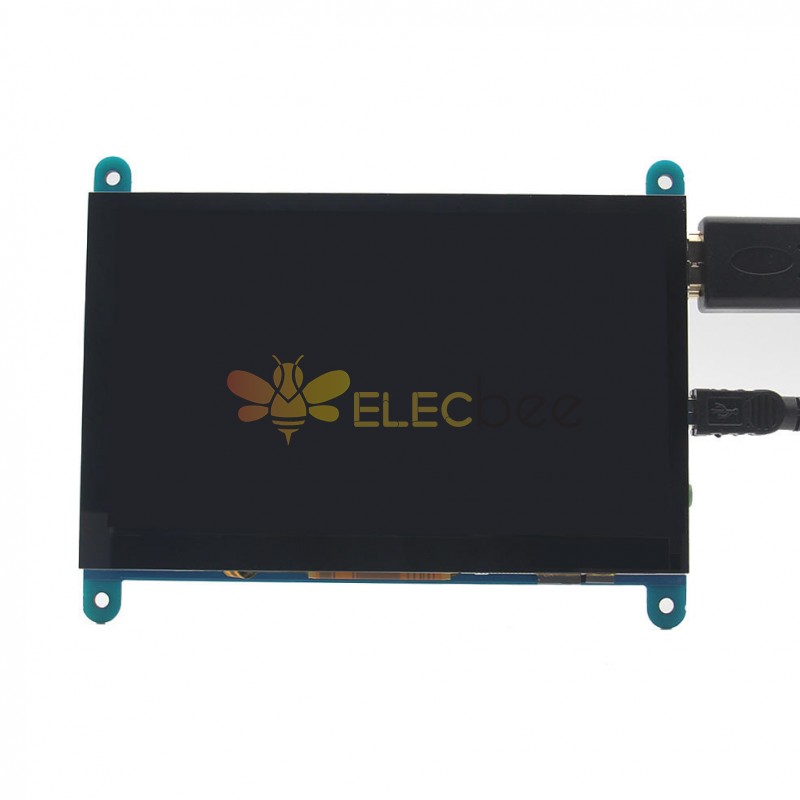
尺寸:5.0(英寸)
Resolution: 800x480(dots),支持最大 HDMI 分辨率 1920X1080
触控:5点电容触控
音频输出:支持
尺寸:121.11x95.24(mm)
重量:248(克)
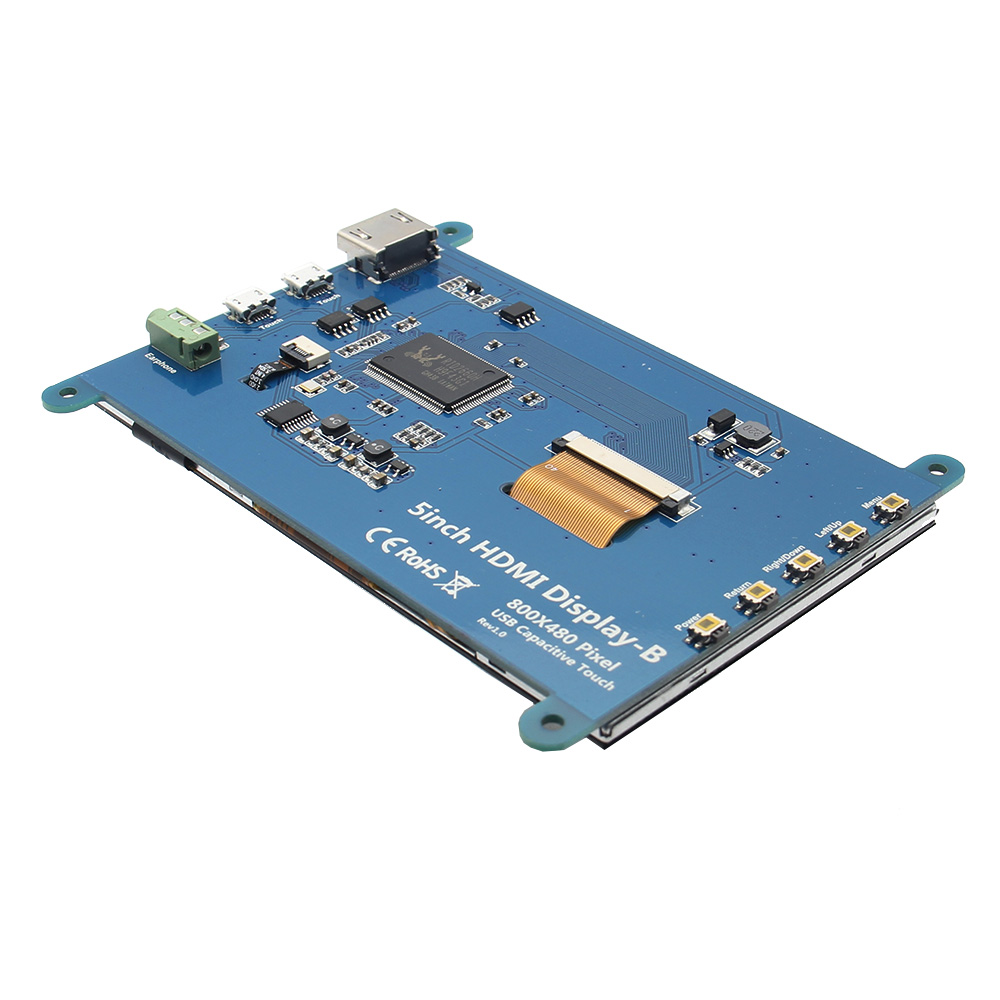
硬件说明:
耳机:3.5mm音频输出接口
Touch: USB connector(For power supply and touch output,the functions of the both are the same,can just use one of them)
显示:HDMI接口(用于连接主板和液晶显示器)
电源:控制背光灯的开启和关闭以节省电量
Return:返回(仅在 OSD 设置菜单中有效)
Right/Down:方向右/下(背光快捷键0
左/上:方向左/上(背光快捷键)
菜单:打开 OSD / 选择键(仅在 OSD 设置菜单中有效)
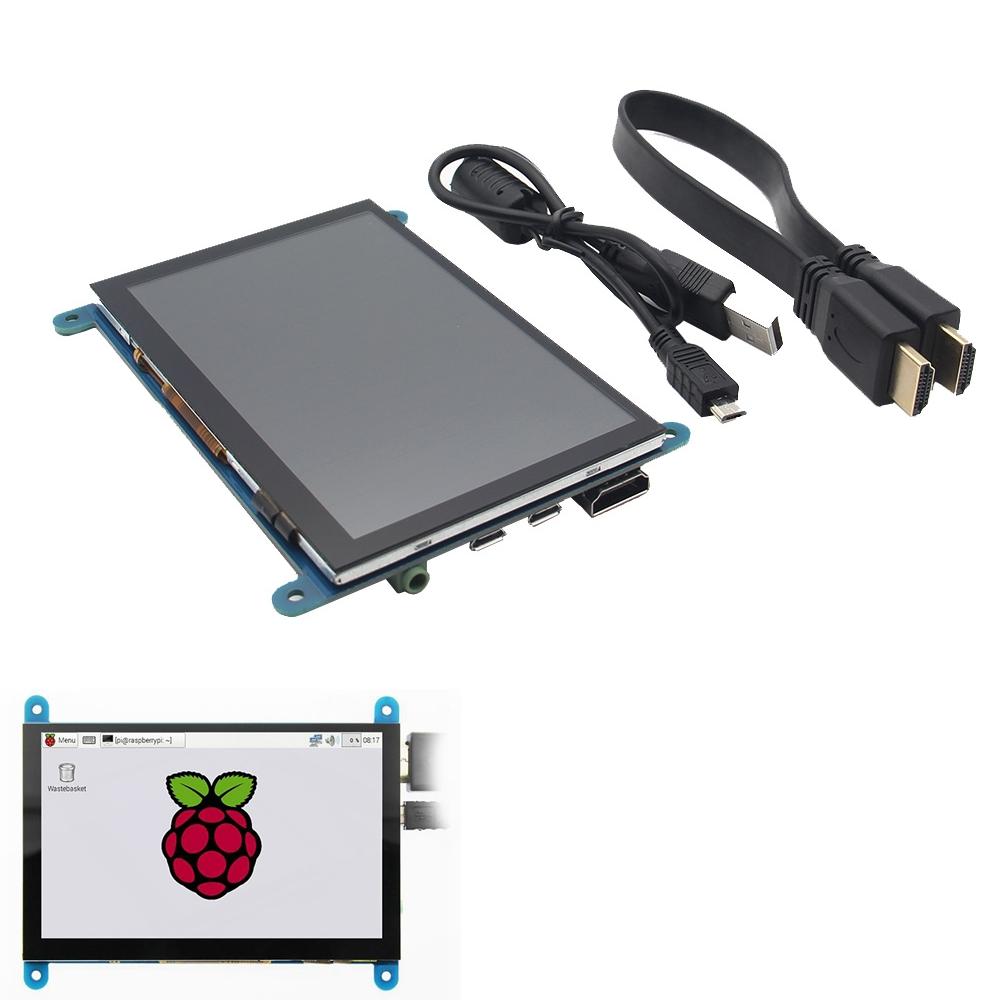
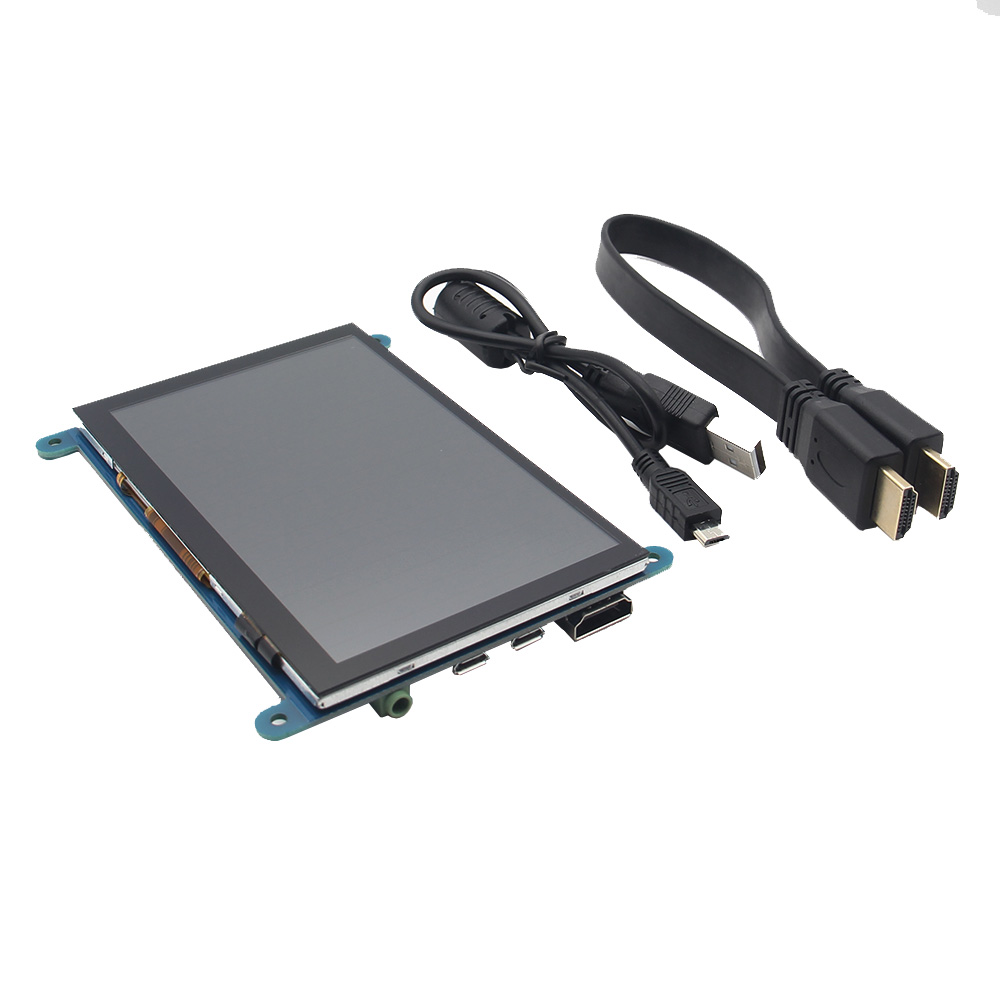
包装包括:
1 x 5 英寸 HDMI 触摸屏(带安装螺丝)
1 x HDMI 线(约 31.5 厘米/12.40 英寸)
1 x USB 数据线(约 42.5 厘米/16.73 英寸)
如何与 Raspbian/Ubuntu Mate/Win10 IoT 核心系统一起使用:
第一步:安装 Raspbian 官方镜像
1)从官方下载中下载最新的镜像。
2)按照官方教程步骤安装系统。
Step 2: modify the “config.txt” After the programming of Step1 is completed,open the config.txt file of Micro SD Card root directory and add the following code at the end of the file,save and eject Micro SD Card safely:
max_usb_current=1
hdmi_force_hotplug=1
config_hdmi_boost=7
hdmi_group=2
hdmi_mode=1
hdmi_mode=87
hdmi_drive=1
hdmi_cvt 800 480 60 6 0 0 0
Step 3: Insert the Micro SD Card to Raspberry Pi,connect the Raspberry Pi and LCD by HDMI cable; connect USB cable to one of the four USB ports of Raspberry Pi,and connect the other end of the USB cable to the USB port of the LCD; then supply power to Raspberry Pi; after that if the display and touch both are OK,it means drive successfully (please use the full 2A for power supply).
如何旋转显示方向:
1/ 在“config.txt”文件中添加语句(“config.txt”文件位于/boot):
display_rotate=1 #0: 0; 1:90; 2:180; 3:270
2/保存后重启树莓派。
须藤重启
如何旋转触摸方向:
After the display is rotated,the touch needs to be modified.
1/ 安装 libinput
sudo apt-get install xserver-xorg-input-libinput
2/ Create the xorg.conf. D directory in /etc/x11 / below (if the directory already exists,this will proceed directly to step 3)
须藤 mkdir /etc/X11/xorg.conf.d
3/ 将文件“40-libinput.conf”复制到刚刚创建的目录中。
sudo cp /usr/share/X11/xorg.conf.d/40-libinput.conf /etc/X11/xorg.conf.d/
4/编辑“/etc/X11/xorg.conf.d/40-libinput.conf”
须藤纳米/etc/X11/xorg.conf.d/40-libinput.conf
Find a part of the touchscreen,add the following statement inside,press Ctrl+X to exit,press Y to save.
选项“校准矩阵”“0 1 0 -1 0 1 0 0 1”
5/ 重启你的树莓派
须藤重启
完成上述步骤进行 90 度旋转。
笔记:
0 度旋转参数:选项“CalibrationMatrix”“1 0 0 0 1 0 0 0 1”
90 度旋转参数:选项“CalibrationMatrix”“0 1 0 0-1 1 0 0 1”
180度旋转参数:选项“CalibrationMatrix”“1 0 0-1 1 0 0 1”
270 度旋转参数:选项“CalibrationMatrix”“0-1 1 1 0 0 0 0 1”
如何用作电脑显示器:
使用 HDMI 线将电脑 HDMI 输出信号连接到 LCD HDMI 接口
将 LCD 的 USB Touch 接口(两个 MicroUSB 中的一个)连接到设备的 USB 端口
If there are several monitors,please unplug other monitor connectors first,and use LCD as the only monitor for testing.
-5" 标准显示器,800x480 分辨率
-Capacitive touch screen,support 5 point touch maximum
-Built-in OSD menu adjustment function (adjustable Contrast/ Brightness/Saturation,etc.)
-It is compatible with mainstream mini PC such as Raspberry Pi,BB Black,Banana Pi
-It can also be used as a general-purpose HDMI display,connecting computers,TV boxes,Xbox360, and so on
-Used as a Raspberry Pi display that supports Raspbian,Ubuntu,K0 di,Win10 IOT,single-touch,free drive
-Work as a PC monitor,support Win7,Win8,Win10 system 5 point touch (XP and older version system: single-point touch),free drive
-支持HDMI音频输出
-Passed CE,RoHS certification
规格:
尺寸:5.0(英寸)
Resolution: 800x480(dots),支持最大 HDMI 分辨率 1920X1080
触控:5点电容触控
音频输出:支持
尺寸:121.11x95.24(mm)
重量:248(克)
硬件说明:
耳机:3.5mm音频输出接口
Touch: USB connector(For power supply and touch output,the functions of the both are the same,can just use one of them)
显示:HDMI接口(用于连接主板和液晶显示器)
电源:控制背光灯的开启和关闭以节省电量
Return:返回(仅在 OSD 设置菜单中有效)
Right/Down:方向右/下(背光快捷键0
左/上:方向左/上(背光快捷键)
菜单:打开 OSD / 选择键(仅在 OSD 设置菜单中有效)
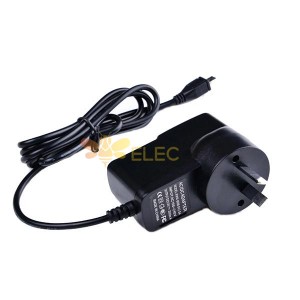
包装包括:
1 x 5 英寸 HDMI 触摸屏(带安装螺丝)
1 x HDMI 线(约 31.5 厘米/12.40 英寸)
1 x USB 数据线(约 42.5 厘米/16.73 英寸)
如何与 Raspbian/Ubuntu Mate/Win10 IoT 核心系统一起使用:
第一步:安装 Raspbian 官方镜像
1)从官方下载中下载最新的镜像。
2)按照官方教程步骤安装系统。
Step 2: modify the “config.txt” After the programming of Step1 is completed,open the config.txt file of Micro SD Card root directory and add the following code at the end of the file,save and eject Micro SD Card safely:
max_usb_current=1
hdmi_force_hotplug=1
config_hdmi_boost=7
hdmi_group=2
hdmi_mode=1
hdmi_mode=87
hdmi_drive=1
hdmi_cvt 800 480 60 6 0 0 0
Step 3: Insert the Micro SD Card to Raspberry Pi,connect the Raspberry Pi and LCD by HDMI cable; connect USB cable to one of the four USB ports of Raspberry Pi,and connect the other end of the USB cable to the USB port of the LCD; then supply power to Raspberry Pi; after that if the display and touch both are OK,it means drive successfully (please use the full 2A for power supply).
如何旋转显示方向:
1/ 在“config.txt”文件中添加语句(“config.txt”文件位于/boot):
display_rotate=1 #0: 0; 1:90; 2:180; 3:270
2/保存后重启树莓派。
须藤重启
如何旋转触摸方向:
After the display is rotated,the touch needs to be modified.
1/ 安装 libinput
sudo apt-get install xserver-xorg-input-libinput
2/ Create the xorg.conf. D directory in /etc/x11 / below (if the directory already exists,this will proceed directly to step 3)
须藤 mkdir /etc/X11/xorg.conf.d
3/ 将文件“40-libinput.conf”复制到刚刚创建的目录中。
sudo cp /usr/share/X11/xorg.conf.d/40-libinput.conf /etc/X11/xorg.conf.d/
4/编辑“/etc/X11/xorg.conf.d/40-libinput.conf”
须藤纳米/etc/X11/xorg.conf.d/40-libinput.conf
Find a part of the touchscreen,add the following statement inside,press Ctrl+X to exit,press Y to save.
选项“校准矩阵”“0 1 0 -1 0 1 0 0 1”
5/ 重启你的树莓派
须藤重启
完成上述步骤进行 90 度旋转。
笔记:
0 度旋转参数:选项“CalibrationMatrix”“1 0 0 0 1 0 0 0 1”
90 度旋转参数:选项“CalibrationMatrix”“0 1 0 0-1 1 0 0 1”
180度旋转参数:选项“CalibrationMatrix”“1 0 0-1 1 0 0 1”
270 度旋转参数:选项“CalibrationMatrix”“0-1 1 1 0 0 0 0 1”
如何用作电脑显示器:
使用 HDMI 线将电脑 HDMI 输出信号连接到 LCD HDMI 接口
将 LCD 的 USB Touch 接口(两个 MicroUSB 中的一个)连接到设备的 USB 端口
If there are several monitors,please unplug other monitor connectors first,and use LCD as the only monitor for testing.
第一步:安装 Raspbian 官方镜像
1)从官方下载中下载最新的镜像。
2)按照官方教程步骤安装系统。
Step 2: modify the “config.txt” After the programming of Step1 is completed,open the config.txt file of Micro SD Card root directory and add the following code at the end of the file,save and eject Micro SD Card safely:
max_usb_current=1
hdmi_force_hotplug=1
config_hdmi_boost=7
hdmi_group=2
hdmi_mode=1
hdmi_mode=87
hdmi_drive=1
hdmi_cvt 800 480 60 6 0 0 0
Step 3: Insert the Micro SD Card to Raspberry Pi,connect the Raspberry Pi and LCD by HDMI cable; connect USB cable to one of the four USB ports of Raspberry Pi,and connect the other end of the USB cable to the USB port of the LCD; then supply power to Raspberry Pi; after that if the display and touch both are OK,it means drive successfully (please use the full 2A for power supply).
如何旋转显示方向:
1/ 在“config.txt”文件中添加语句(“config.txt”文件位于/boot):
display_rotate=1 #0: 0; 1:90; 2:180; 3:270
2/保存后重启树莓派。
须藤重启
如何旋转触摸方向:
After the display is rotated,the touch needs to be modified.
1/ 安装 libinput
sudo apt-get install xserver-xorg-input-libinput
2/ Create the xorg.conf. D directory in /etc/x11 / below (if the directory already exists,this will proceed directly to step 3)
须藤 mkdir /etc/X11/xorg.conf.d
3/ 将文件“40-libinput.conf”复制到刚刚创建的目录中。
sudo cp /usr/share/X11/xorg.conf.d/40-libinput.conf /etc/X11/xorg.conf.d/
4/编辑“/etc/X11/xorg.conf.d/40-libinput.conf”
须藤纳米/etc/X11/xorg.conf.d/40-libinput.conf
Find a part of the touchscreen,add the following statement inside,press Ctrl+X to exit,press Y to save.
选项“校准矩阵”“0 1 0 -1 0 1 0 0 1”
5/ 重启你的树莓派
须藤重启
完成上述步骤进行 90 度旋转。
笔记:
0 度旋转参数:选项“CalibrationMatrix”“1 0 0 0 1 0 0 0 1”
90 度旋转参数:选项“CalibrationMatrix”“0 1 0 0-1 1 0 0 1”
180度旋转参数:选项“CalibrationMatrix”“1 0 0-1 1 0 0 1”
270 度旋转参数:选项“CalibrationMatrix”“0-1 1 1 0 0 0 0 1”
如何用作电脑显示器:
使用 HDMI 线将电脑 HDMI 输出信号连接到 LCD HDMI 接口
将 LCD 的 USB Touch 接口(两个 MicroUSB 中的一个)连接到设备的 USB 端口
If there are several monitors,please unplug other monitor connectors first,and use LCD as the only monitor for testing.
 ,
, ,
, ,
, ,
, ,
,
- 商品评价
- 商品咨询
-
:Elecbee产品的起源在哪里?它们是否获得了认证?2023-03-03
-
店主回复:
Elecbee与中国的OEM工厂长期合作,以此来降低中间渠道成本,帮助您节省开支。我们的产品都是严格按照相关全球标准制作的,以确保产品具有良好的兼容性和卓越的品质。
2023-03-03
-
:您接受哪些付款方式?2023-03-03
-
店主回复:
我们的主要付款方式包括Paypal、信用卡、借记卡、银行转账等等,更多付款方式等待您的发现。请选取您喜欢的付款方式。
2023-03-03
-
:您何时安排发货?2023-03-03
-
店主回复:
在确认收到您的付款后,我们会尽快安排送货,并上传快递单号至网站,以供您跟踪。
2023-03-03
-
:如何进行退换货?2023-03-03
-
店主回复:
1.您可以在收到商品后的30天内申请退货。请确保外包装完好无损,产品保持原状。一旦我们收到包裹,根据相关规定安排退款。
2.退货流程:提交退货申请 - 审核通过退货申请 - 安排退货 - 收到商品并检查 - 我们安排退款。
3.对于因我们造成的退货,例如质量问题,我们将承担运费。对于由买家造成的退货,买家应负责运费。
2023-03-03
相关商品
品牌::
Elecbee
型号:: EB0049524
MMDVM 热点支持 P25 DMR YSF + 树莓派零板 + OLED 显示屏 + 8G TFT 卡 + 天线 + 亚克力外壳套件
$112.99